
Mrs Recipe's Thanksgiving Stuffing Balls

Crisp on the outside, tender and savory inside — these stuffing balls are the perfect make-ahead, crowd-pleasing accompaniment for the holiday table.
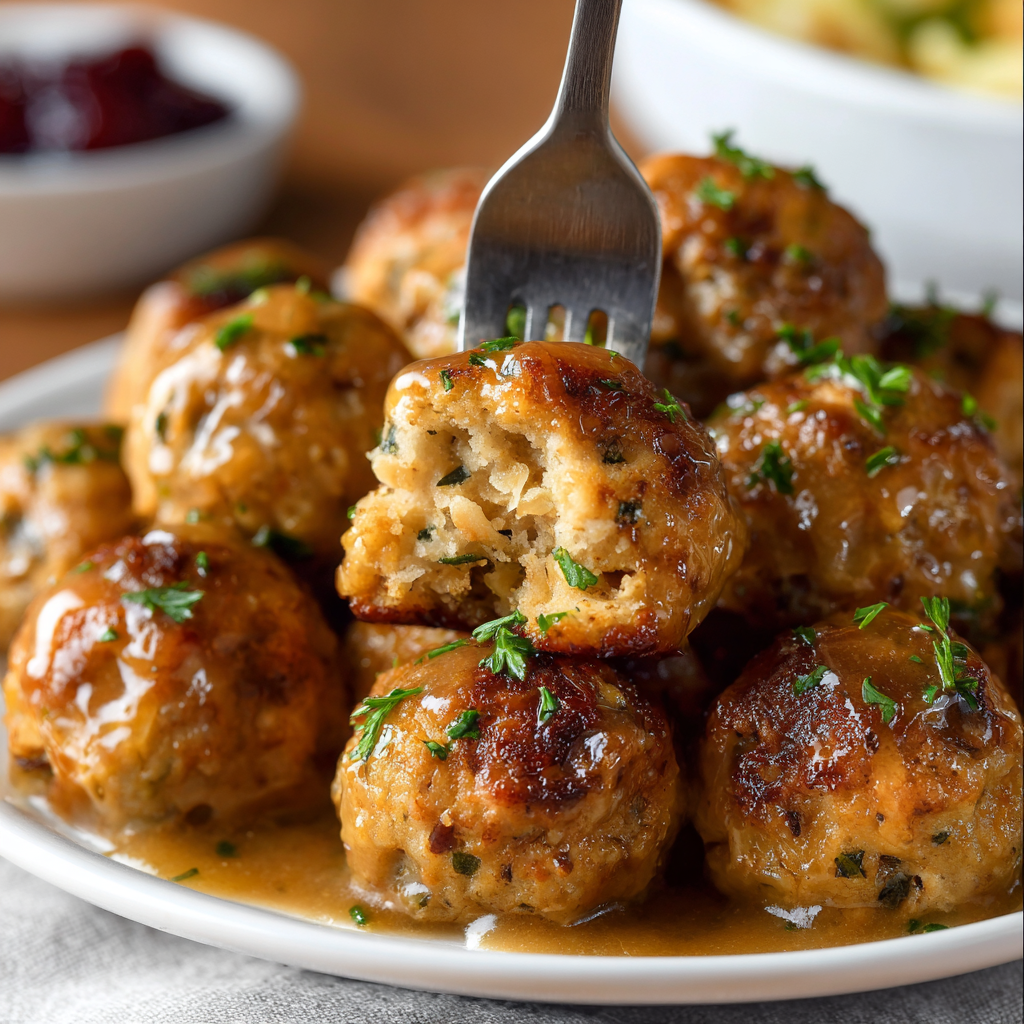
This batch of stuffing balls has been our Thanksgiving favorite since I first learned to make them in my mother-in-law's cozy kitchen. I discovered the golf-ball format on a busy holiday when oven space was at a premium and needed a side that could be handled, plated, and passed around without worry. The result was a revelation: all the familiar flavor of classic stuffing concentrated into small, crisp bites that everyone loved. The outside turns a golden, slightly crunchy crust while the interior stays moist and flavorful, thanks to the gently-toasted bread and just enough broth and beaten eggs to bind the mixture.
I often prepare these a day ahead and reheat them on a baking sheet to restore that crisp texture before serving. The combination of sautéed onion and celery, a hint of garlic, poultry seasoning, fresh parsley, and optional Parmesan creates a savory profile that pairs well with roasted turkey, cranberry sauce, and even leftover mashed potatoes. Every year someone asks for the recipe, and the little ones fight over the last one on the platter. This is comfort food with portability and panache.
Why You'll Love This Recipe
- Compact and portable: shaped into golf-ball size portions for easy passing, kid-friendly eating, and excellent for buffet-style serving.
- Make-ahead friendly: the mixture holds overnight in the refrigerator and the balls re-crisp beautifully in a hot oven, saving precious day-of time.
- Pantry-accessible: uses simple, widely available ingredients like day-old bread, butter, onion, celery, eggs, and broth—no specialty shopping required.
- Customizable: optional Parmesan, sausage, apples, or herbs allow you to adapt the flavor profile for picky eaters or adventurous guests.
- Space-saving: frees up baking dish and roasting pan room on a crowded holiday oven because they bake on a rimmed sheet.
- Consistent texture: toasting the bread first creates a structure that absorbs liquid evenly so the balls hold together without becoming soggy.
My family was skeptical the first time I brought these instead of a casserole, but they quickly became the most-requested item. On busy holidays I appreciate how simple assembly is and how forgiving the mixture can be if it needs a touch more broth or an extra egg to bind. I hope these become a staple at your table too.
Ingredients
- Day-old bread (about 14 ounces / roughly 8 cups cubed): Use a sturdy white or country loaf for the best crumb structure. Day-old bread dries more evenly; if you only have fresh bread, toast it briefly to remove excess moisture. Avoid ultra-soft sandwich bread. I often use a rustic bakery white loaf or sourdough for extra flavor.
- Unsalted butter (1 stick, 1/2 cup): Provides mouthfeel and browning for sautéing vegetables. Using unsalted lets you control seasoning—choose a European-style butter for richer flavor when available.
- Large onion (1), finely chopped: Yellow onion gives sweetness and depth when sautéed. Aim for a uniform dice so it softens evenly with the celery.
- Celery (2 stalks), finely chopped: Offers classic stuffing crunch and aromatic base. Trim fibrous ends and slice thinly for best texture.
- Garlic (2 cloves), minced: Adds a subtle savory lift; do not overcook or it will bitterly caramelize—add toward the end of the sauté.
- Poultry seasoning (2 teaspoons) or sage 1 teaspoon plus thyme 1 teaspoon: If you prefer a single-herb profile, swap the blend for more sage to emphasize classic holiday flavors.
- Salt (1 teaspoon) and black pepper (1/2 teaspoon): Season gradually; chicken or turkey broth can be salty, so taste the mixture before adding the full amount of salt.
- Fresh parsley (1/2 cup), chopped: Brightens the finished balls and prevents the dish from feeling heavy. Flat-leaf parsley works best.
- Eggs (2 large), lightly beaten: Act as a binder to help the balls hold their shape while keeping the interior tender.
- Chicken or turkey broth (1 1/2 cups): Warm broth helps hydrate the toasted bread. Use low-sodium broth if you want more control over salt. Add more by tablespoon if needed.
- Parmesan cheese (1/2 cup, optional): An optional savory boost and glue; grated fresh Parmesan is preferable to pre-grated for flavor.
Instructions
Prepare the bread base: Spread the bread cubes in a single layer on a baking sheet. Toast in a 300 degrees Fahrenheit oven for 10 to 12 minutes until dry to the touch but not browned. This step dries the crumb so it soaks liquid evenly later. Remove and cool while you prepare the rest. Cook the vegetables: Melt the butter in a large skillet over medium heat. Add the onion and celery and sauté for about 6 to 8 minutes until softened and translucent. Add the garlic in the last 60 seconds so it becomes fragrant without burning. Turn off the heat and let the vegetables cool slightly before mixing. Mix the stuffing: Combine the toasted bread, cooked vegetables, poultry seasoning (or sage and thyme), salt, pepper, parsley, and Parmesan if using in a large bowl. Stir in the beaten eggs. Slowly pour in warm broth, folding the mixture until the bread is uniformly moist. The texture should hold together when pressed but not be soggy; add broth a tablespoon at a time if needed. Shape the balls: With slightly damp hands to prevent sticking, form the mixture into balls about the size of a golf ball. Press firmly enough to compact them but avoid overworking which can make them dense. Place each ball on a greased or parchment-lined rimmed baking sheet with space between for even browning. Bake: Preheat the oven to 375 degrees Fahrenheit. Bake the balls for 20 to 25 minutes until the exterior is golden brown and crisp. For extra exterior crunch, transfer balls to a wire rack set over the sheet for the last 5 minutes of baking. Cool slightly before serving.
You Must Know
- Toast the bread first to create structure; skipping this can result in soggy, dense balls because fresh bread absorbs liquid too quickly.
- Make the mixture slightly drier than you think is necessary; it will compact and become moister inside as it bakes.
- These keep well in the refrigerator for up to 48 hours or freeze baked balls for up to 3 months in a freezer-safe container.
- Use low-sodium broth if you want more control over salt; taste before adding the final teaspoon of salt.
What I love most is the way these transform leftovers into something celebratory. Guests often mistake them for a special bakery item rather than a humble side. Every time I make a tray, someone asks whether I added sausage or truffle because the texture and flavor feel elevated. That small sense of surprise is exactly why I keep this recipe in heavy rotation.

Storage Tips
Once baked and cooled, store the balls in an airtight container in the refrigerator for up to 48 hours. To reheat, place on a baking sheet in a 350 degrees Fahrenheit oven for 8 to 12 minutes until warmed through and crisp. For longer storage, freeze cooled balls on a sheet until solid, then transfer to a freezer bag for up to 3 months. Reheat from frozen at 375 degrees Fahrenheit for 18 to 22 minutes.
Ingredient Substitutions
Swap the white loaf for cornbread for a Southern-style variation—use slightly less broth as cornbread is more absorbent. For a vegetarian option use vegetable broth and omit Parmesan or replace eggs with a flax egg (1 tablespoon ground flax mixed with 3 tablespoons water per egg), noting texture will be a touch different. Swap butter for olive oil for a dairy-free version, and use turkey drippings or richer stock if you want a deeper savory profile.
Serving Suggestions
Serve these alongside roasted turkey, grilled Brussels sprouts, and a tangy cranberry relish. Garnish with chopped parsley and a light drizzle of pan juices or gravy for moisture. They pair well with apple-sage sausage for heartier appetites and stand alone as appetizers with mustard or aioli for dipping. Because of their size, they are ideal for holiday buffets and finger-food platters.
Cultural Background
Small shaped stuffing bites are a practical evolution of classic bread stuffing, rooted in British and American holiday traditions. Traditional stuffings were cooked inside poultry, but baking separately became popular for better texture control and more flexible serving. The ball form gained popularity as hosts sought portable, bite-sized ways to serve beloved flavors at gatherings where space and logistics vary.
Seasonal Adaptations
In autumn, fold in roasted butternut squash cubes and chopped sage; in winter add toasted pecans and dried cranberries for sweetness and crunch. For spring and summer, fresh herbs like tarragon and lemon zest brighten the profile. When serving during apple season, sauté small apple cubes with the onion for a sweet-tart contrast that complements pork and poultry.
Meal Prep Tips
Assemble the mixture a day ahead and refrigerate. Shape and bake the day you plan to serve for the best crust. Alternatively, bake and store, then re-crisp before serving. Use portioned silicone muffin liners for uniform sizes and easier serving. Label containers with date and reheat instructions when preparing for potlucks.
Making these stuffing balls has become a ritual that simplifies my holiday prep while delivering consistent, crowd-pleasing results. I encourage you to make the recipe your own with one or two personal touches and to enjoy the small ritual of forming each ball by hand.
Pro Tips
Toast the bread until dry but not browned to ensure consistent absorption of broth.
Test moisture by squeezing a small handful; it should hold together when pressed but not drip or feel soggy.
Chill the mixture for 15 minutes if it feels too loose before shaping to help it bind.
For extra crunch, finish on a wire rack for the last five minutes of baking.
Use slightly damp hands when shaping to prevent sticking and get smooth surfaces.
This nourishing mrs recipe's thanksgiving stuffing balls recipe is sure to be a staple in your kitchen. Enjoy every moist, high protein slice — it is perfect for breakfast or as a wholesome snack any time.
FAQs about Recipes
Can I make the mixture ahead of time?
Yes. You can prepare the mixture a day in advance, keep it refrigerated, then shape and bake on the day you serve.
How do I freeze and reheat the balls?
Freeze baked balls on a baking sheet until solid, then transfer to a freezer bag for up to 3 months. Reheat from frozen at 375 degrees Fahrenheit for 18 to 22 minutes.
Tags
Mrs Recipe's Thanksgiving Stuffing Balls
This Mrs Recipe's Thanksgiving Stuffing Balls recipe makes perfectly juicy, tender, and flavorful steak every time! Serve with potatoes and a side salad for an unforgettable dinner in under 30 minutes.
Ingredients
Main
Instructions
Prepare the bread base
Spread bread cubes on a baking sheet and toast in a 300 degrees Fahrenheit oven for 10 to 12 minutes until dry but not browned. Cool before using so the mixture does not steam.
Cook the vegetables
Melt butter in a large skillet over medium heat. Sauté onion and celery for 6 to 8 minutes until softened, add garlic in the last minute, then remove from heat and allow to cool slightly.
Mix the stuffing
Combine the toasted bread, vegetables, poultry seasoning, salt, pepper, parsley, and Parmesan in a large bowl. Stir in beaten eggs and gradually add warm broth until the mixture holds together when pressed but is not soggy.
Shape the balls
With damp hands, form the mixture into golf-ball sized portions, pressing gently to compact without overworking. Place on a parchment-lined baking sheet with space between each ball.
Bake
Preheat the oven to 375 degrees Fahrenheit. Bake for 20 to 25 minutes until golden brown and crisp on the outside. For extra crunch, finish on a wire rack for the last five minutes.
Last Step: Please leave a rating and comment letting us know how you liked this recipe! This helps our business to thrive and continue providing free, high-quality recipes for you.
Nutrition
Did You Make This?
Leave a comment & rating below or tag
@mrsrecipe on social media!
Categories:
You might also like...

5-Minute Thanksgiving Appetizers That Wow Every Guest
Tiny crostini topped with creamy cheese, bright cranberry, crunchy pecans and rosemary — an effortless 5-minute starter that looks festive and tastes like the holidays.

African-Style Pancakes (Fluffy, Comforting, and Easy)
Light, slightly spiced pancakes inspired by African home kitchens—fluffy, buttery, and perfect for breakfast or brunch with syrup, cinnamon sugar, or a savory filling.

Air Fryer Bang Bang Chicken Skewers
Crispy, saucy chicken skewers made in the air fryer with a sweet-spicy bang bang sauce—perfect for weeknight dinners, parties, or meal prep.
Did You Make This?
Leave a comment & rating below or tag @mrsrecipe on social media!
Rate This Recipe
Share This Recipe
Enjoyed this recipe? Share it with friends and family, and don't forget to leave a review!
Comments (1)
This recipe looks amazing! Can't wait to try it.
Comments are stored locally in your browser. Server comments are displayed alongside your local comments.
Hi, I'm Clara!
What's Popular
Get My 30-Minute Meals email series!
Quick and easy dinner ideas delivered to your inbox.