
Halloween Ice Cream That Will Delight Your Spooky Season

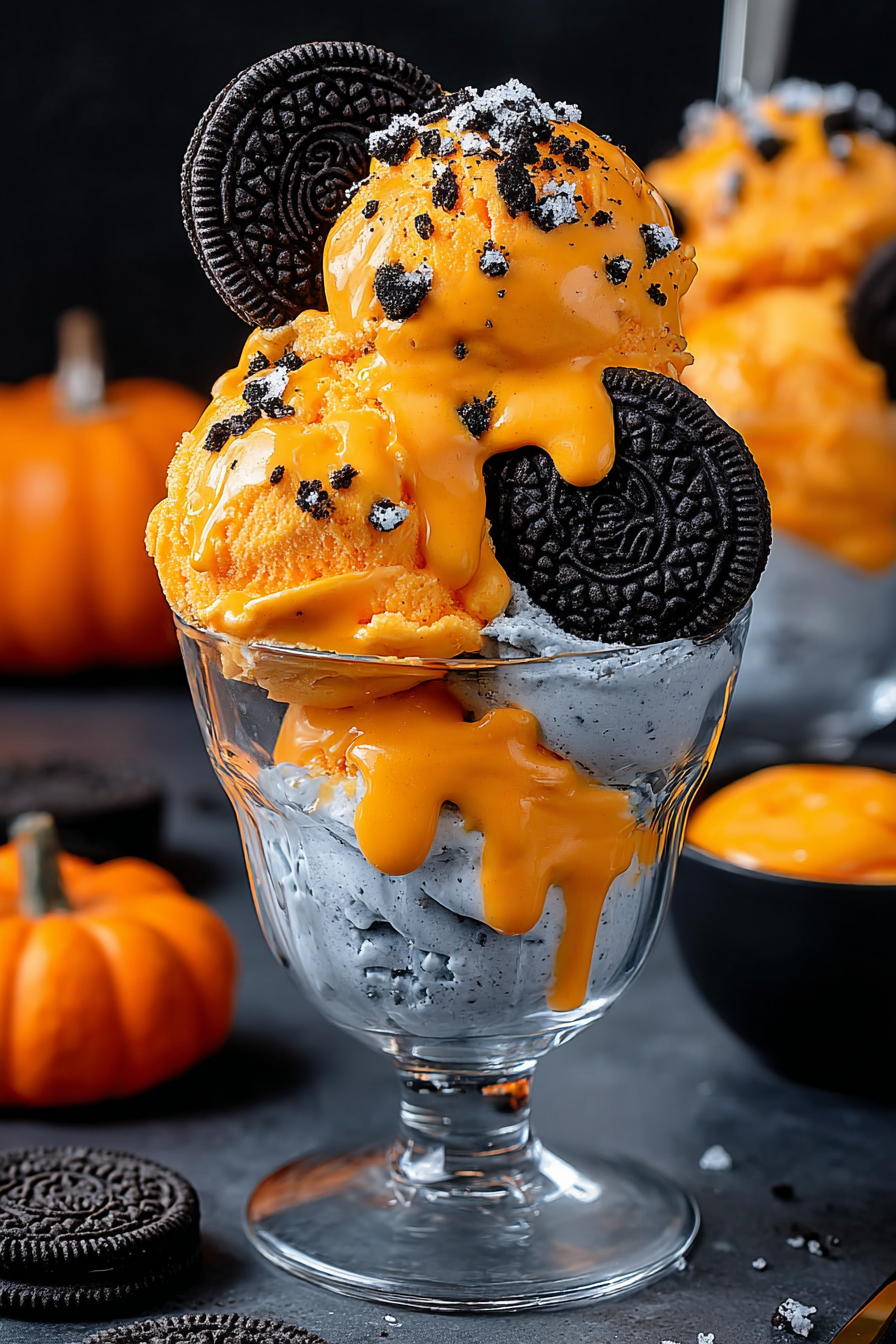
A no-churn orange Oreo ice cream studded with cookie crunch and cheeky gummy worms — a simple, crowd-pleasing treat for Halloween gatherings.
This Halloween ice cream has been my go-to celebration dessert for the last few seasons, showing up at neighborhood potlucks and family movie nights with equal success. I first developed this version on a rainy October afternoon when I wanted something festive but fuss-free: bright orange, doughy Oreo crunch, and a playful gummy topping to make everyone grin. The texture is simultaneously rich and airy thanks to whipped heavy cream, and the sweetened condensed milk provides that perfect creamy sweetness without the need to churn. It’s a recipe born of practical pantry ingredients that somehow looks like a party centerpiece.
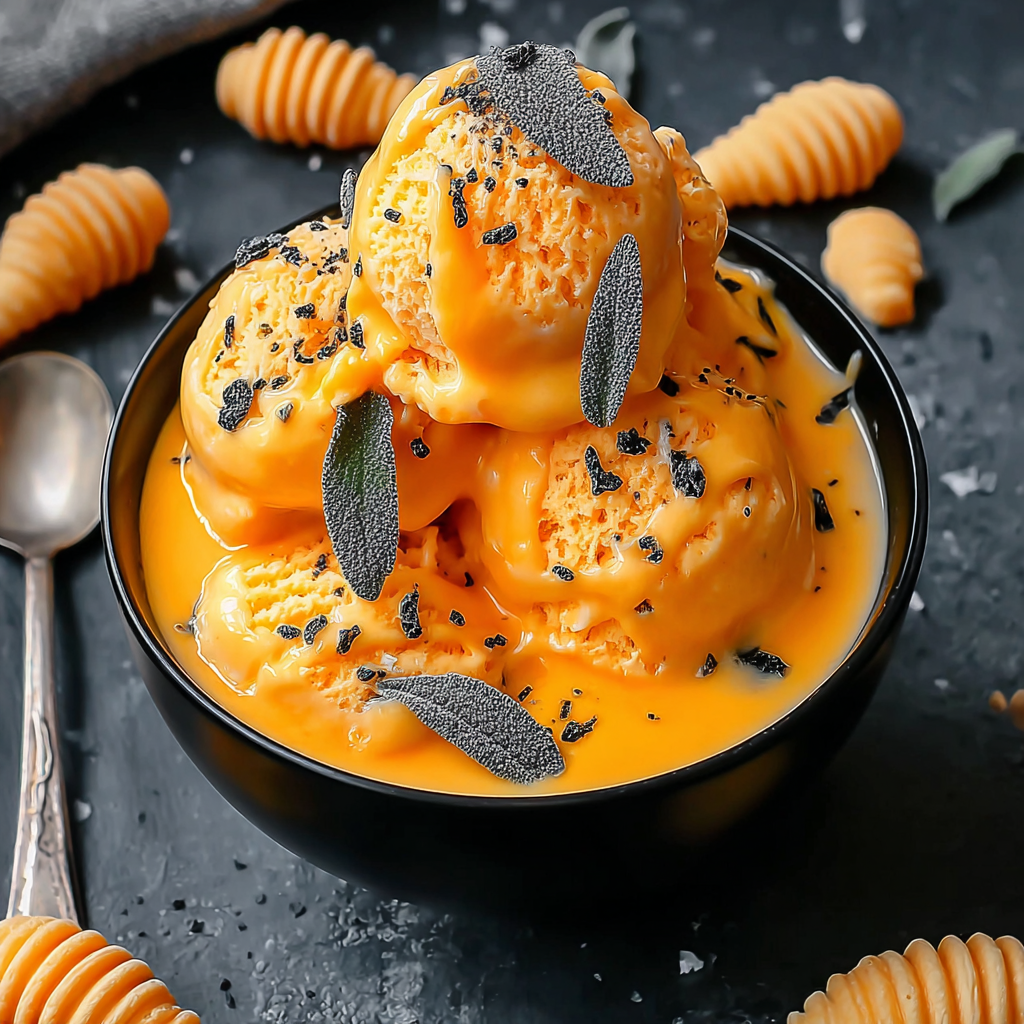
I discovered how much joy a few drops of orange gel food coloring could add to a simple base, creating that unmistakable Halloween vibe. The contrast of black cookie crumbs against the orange base creates dramatic scoops that kids love, while adults appreciate the straightforward technique and intense flavor. This version is designed to be forgiving: use a hand mixer, fold gently, and freeze. The result is a scoopable, creamy treat that keeps its color and crunch even after freezing overnight. Whenever I bring a loaf pan of this to a gathering, it disappears quickly, and the gummy worms are always the first thing chosen for the photo-op moment.
Why You'll Love This Recipe
- Ready with just 15 minutes of hands-on time and no ice cream maker required, perfect for busy weeknights or last-minute parties.
- Uses pantry staples like heavy cream and a can of sweetened condensed milk, plus chocolate sandwich cookies for crunchy contrast.
- Flexible and forgiving: swap the extract or color, and the base still holds up; it’s ideal for novice bakers and experienced cooks alike.
- Make-ahead friendly: assemble the night before and freeze for at least 6 hours; it travels well to potlucks when kept cold in a cooler.
- Kid-friendly presentation with gummy worms or candy eyeballs, yet sophisticated enough for adult Halloween cocktails and dessert tables.
Personally, this recipe has become a seasonal ritual. My niece insisted on helping the first time we made it, carefully placing gummy worms and insisting the orange be “extra bright.” The layered textures and playful presentation mean it always gets comments, and I love how simple techniques deliver such impressive results.
Ingredients
- Heavy whipping cream: 2 cups. Use very cold cream straight from the refrigerator for the best volume when whipping. I like a brand with 36 percent milk fat for richness; colder cream whips faster and yields firmer peaks.
- Sweetened condensed milk: 1 (14-ounce) can. This provides both sweetness and structure so you can skip churning. No substitutions recommended if you want the same texture and sweetness balance.
- Vanilla extract: 1 teaspoon. Pure vanilla extract adds depth; you can experiment with almond or orange extract if you want a variation, but start with less — extracts are potent.
- Orange gel food coloring: 5 drops. Gel coloring gives intense hue without thinning the mixture. Add more a drop at a time if you prefer a deeper color.
- Crushed Oreo cookies: 1 cup. Chocolate sandwich cookies provide crunch and visual contrast. Crush to varied sizes for the best texture — a mix of fine crumbs and small chunks is ideal.
- Gummy worms: 1 cup for topping. Optional but fun; candy eyeballs or chopped chocolate work well if you want something less sticky.
Instructions
Whip the cream:Chill a large mixing bowl and beaters in the freezer for 10 minutes if you can; cold equipment helps the cream whip faster. Pour 2 cups of very cold heavy whipping cream into the bowl and beat on high speed with an electric mixer until stiff peaks form, about 3 to 5 minutes. You should be able to lift the beaters and see firm peaks that hold their shape. Take care not to overwhip or the cream will become grainy and begin to separate into butterfat and buttermilk.Combine the sweetened condensed mixture:In a separate medium bowl, whisk together the entire 14-ounce can of sweetened condensed milk, 1 teaspoon vanilla extract, and 5 drops of orange gel food coloring until evenly tinted. Taste a small spoonful — the mixture should be noticeably sweet, as freezing will slightly mute the flavor. If the orange is faint, add one drop at a time until you reach the desired shade.Fold cream into base:Gently fold the whipped cream into the colored condensed milk in three additions. Use a rubber spatula and a light hand, folding through the center and turning the bowl, to keep the mixture airy. Aim for uniform color without deflating the whipped cream. Stop folding when no large streaks remain; a few small streaks are fine.Add the cookie crunch:Fold in 1 cup of crushed Oreo cookies until distributed evenly. Leave some larger pieces for texture. Stir gently to avoid overmixing; the crunch should appear suspended throughout the orange base so each scoop has both creamy and crunchy elements.Freeze in pan:Pour the mixture into a loaf pan and smooth the top with an offset spatula. Press a piece of plastic wrap directly onto the surface to reduce ice crystals, then cover tightly with foil. Freeze flat for at least 6 hours or overnight. For the best scoopable texture, allow the pan to sit at room temperature for 5 to 10 minutes before scooping.Serve and garnish:Scoop into bowls or cones and garnish with gummy worms, candy eyeballs, or extra cookie crumbs. If you want dramatic presentation, nestle gummy worms so they peek from the scoop, creating a fun spooky effect. Keep leftovers tightly covered and freeze; scoop from partially thawed ice cream for cleaner presentation.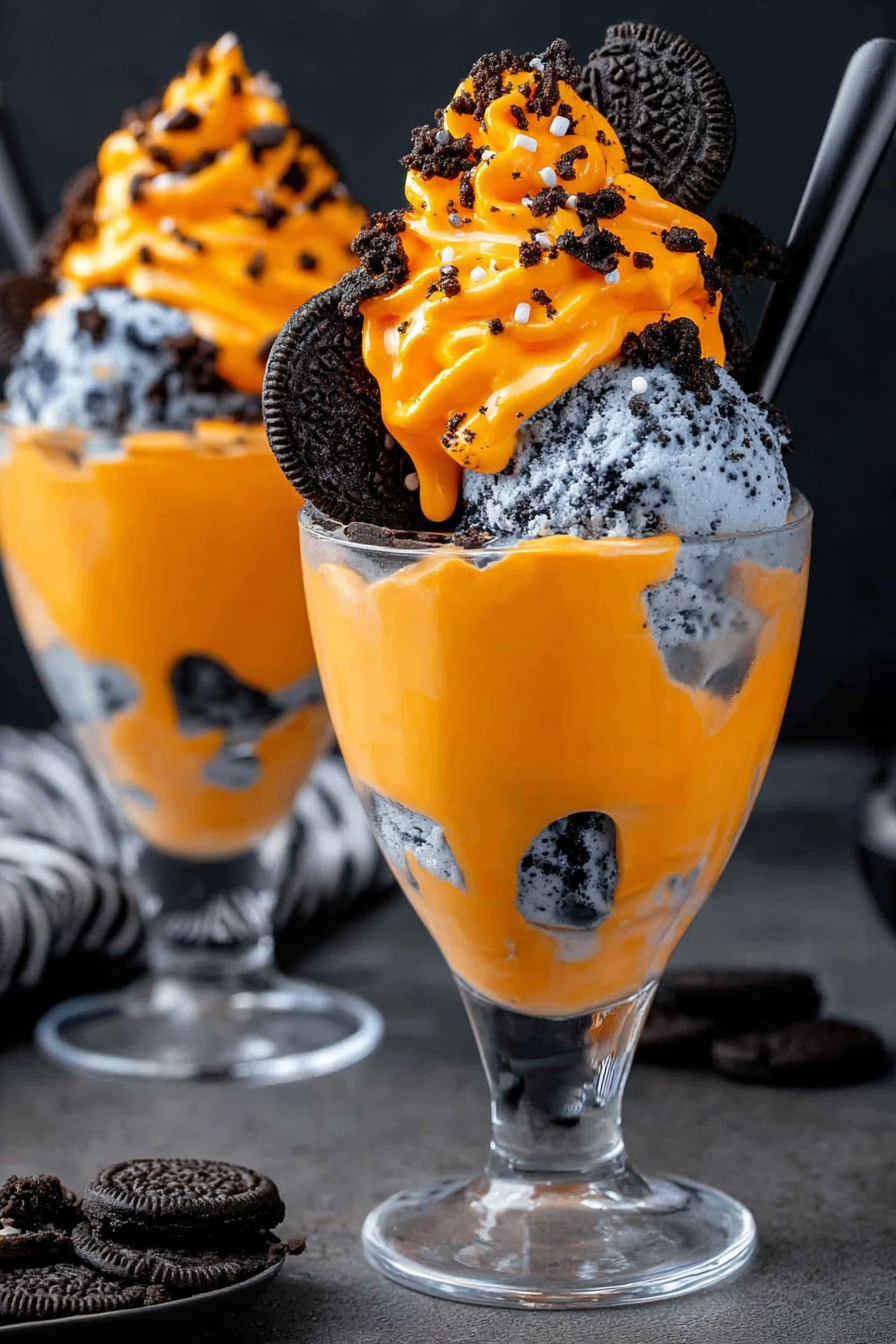
You Must Know
- This treat is high in fat and sugar and packs rich calories; freezing locks in structure so it stays scoopable even after a day in the freezer.
- Store tightly wrapped and consume within one week for best texture; it freezes well up to three months but color and candy toppings may degrade.
- Allergens: contains dairy and gluten; gummy toppings may include gelatin and additional allergens, so check labels for sensitive guests.
- Make-ahead friendly: assemble and freeze the night before an event, then transfer to a cooler for transport. Use dry ice or frozen gel packs for longer trips.
One of my favorite details is how the simple addition of cookie chunks transforms the texture: you get creamy silk interrupted by satisfying crunch. Family and friends always comment on the color and the playful gummy garnish. I once served this at a Halloween bake sale and parents bought extra containers to take home — a sure sign a dessert has crossed into beloved territory.
Storage Tips
Store unused portions in an airtight container or press plastic wrap directly onto the surface of the remaining ice cream before covering to minimize freezer burn. For easiest scooping, transfer a portion to the refrigerator 10 to 15 minutes before serving, or leave at room temperature for 5 to 10 minutes. Keep in mind that additives like gummy worms can become sticky if thawed and refrozen, so add them just before serving if you plan to store the ice cream long-term. Label the container with the date and use within one week for the best flavor; for longer storage, freeze up to three months.
Ingredient Substitutions
If you need to adapt ingredients, there are a few successful swaps. Replace gummy worms with candy eyeballs, chopped chocolate, toasted nuts, or sprinkles for texture and decoration. For a chocolate base, fold in 2 tablespoons of unsweetened cocoa powder to the condensed milk before combining. If you need gluten-free, use certified gluten-free chocolate sandwich cookies. Note that replacing heavy cream with a non-dairy whipping alternative will change texture dramatically; stabilized dairy-free creams exist but may not yield the same airy structure.
Serving Suggestions
Serve scoops in waffle cones for a playful trick-or-treat feel, or present in small clear cups with a single gummy worm for a diner-style portion. Pair with warm spiced cider or a dark coffee to balance the sweetness. Garnish with extra crushed cookies and a light dusting of cocoa for a more grown-up presentation. For a party, make an ice cream bar with bowls of toppings like chopped Oreos, mini chocolate chips, candy corn, and caramel sauce so guests can customize their spooky sundaes.
Cultural Background
While not a traditional holiday food, festive no-churn ice cream blends American convenience cooking with seasonal decoration trends. The idea of using bright colors and candy garnishes for holidays is rooted in celebratory confectionery practices. Oreo cookies, originally introduced in the United States in 1912, have become a staple for adding crunch and chocolate contrast in many modern frozen desserts. This dessert leans into that American party tradition of easy, visually striking sweets served at community gatherings and school events.
Seasonal Adaptations
Adapt this concept for other holidays by changing color and toppings: use red food coloring and strawberry candy for Valentine’s Day, green coloring and mint chips for St. Patrick’s Day, or pastel colors with marshmallow pieces for spring. In late fall, try adding a pinch of ground cinnamon and nutmeg to the condensed milk for a warm spice note that echoes pumpkin spice flavors without adding actual pumpkin puree, which would alter texture.
Meal Prep Tips
For meal prep or entertaining, make several pans at once and freeze. Portion into single-serving containers for grab-and-go desserts; these reheat well in a microwave for a few seconds if you want a softened texture. When freezing multiple pans, stack them flat and separate layers with a thin sheet of cardboard or a baking tray so they freeze evenly. Keep an inventory on the freezer door so you know what flavor variations are available for last-minute guests.
Enjoy making this cheerful, spooky dessert — it’s a simple way to bring color, crunch, and a lot of smiles to your seasonal celebrations. Encourage experimentation and have fun with the presentation: the playful element is half the joy.
Pro Tips
Chill your mixing bowl and beaters for 10 minutes before whipping the cream to speed up whipping and create firmer peaks.
Fold in components gently and in stages to preserve the airy texture provided by the whipped cream.
Press plastic wrap directly onto the surface before covering to reduce ice crystal formation and maintain a smooth texture.
Allow the pan to sit 5 to 10 minutes before scooping to soften slightly for cleaner, rounder scoops.
This nourishing halloween ice cream that will delight your spooky season recipe is sure to be a staple in your kitchen. Enjoy every moist, high protein slice — it is perfect for breakfast or as a wholesome snack any time.
FAQs about Recipes
How long do I freeze this?
Freeze for at least 6 hours or overnight; allow to sit 5 to 10 minutes at room temperature before scooping for cleaner portions.
Can I make this gluten-free?
Yes — swap crushed Oreos for gluten-free chocolate sandwich cookies to make the dessert gluten-free, but check all labels for cross-contamination.
Tags
Halloween Ice Cream That Will Delight Your Spooky Season
This Halloween Ice Cream That Will Delight Your Spooky Season recipe makes perfectly juicy, tender, and flavorful steak every time! Serve with potatoes and a side salad for an unforgettable dinner in under 30 minutes.
Ingredients
Ice Cream Base
Crunch
Topping
Instructions
Whip the cream
Chill your bowl and beaters if possible, then whip 2 cups of very cold heavy whipping cream on high speed until stiff peaks form, about 3 to 5 minutes. Stop as soon as peaks hold their shape to avoid overwhipping.
Mix the base
Whisk together 1 (14-ounce) can sweetened condensed milk, 1 teaspoon vanilla extract, and 5 drops orange gel food coloring in a separate bowl until evenly combined and colored.
Fold gently
Fold the whipped cream into the colored condensed milk in three additions using a rubber spatula, maintaining as much air as possible for a light texture.
Add cookie crunch
Fold in 1 cup crushed Oreo cookies until distributed, leaving some larger pieces for texture; avoid overmixing to preserve pockets of crunch.
Freeze in pan
Transfer mixture into a loaf pan, smooth the surface, press plastic wrap directly onto the top, cover with foil, and freeze flat for at least 6 hours or overnight.
Serve and garnish
Let the pan sit at room temperature for 5 to 10 minutes before scooping. Garnish scoops with gummy worms or candy eyeballs just before serving for best presentation.
Last Step: Please leave a rating and comment letting us know how you liked this recipe! This helps our business to thrive and continue providing free, high-quality recipes for you.
Nutrition
Did You Make This?
Leave a comment & rating below or tag
@mrsrecipe on social media!
Categories:
You might also like...

5-Minute Thanksgiving Appetizers That Wow Every Guest
Tiny crostini topped with creamy cheese, bright cranberry, crunchy pecans and rosemary — an effortless 5-minute starter that looks festive and tastes like the holidays.

African-Style Pancakes (Fluffy, Comforting, and Easy)
Light, slightly spiced pancakes inspired by African home kitchens—fluffy, buttery, and perfect for breakfast or brunch with syrup, cinnamon sugar, or a savory filling.

Air Fryer Bang Bang Chicken Skewers
Crispy, saucy chicken skewers made in the air fryer with a sweet-spicy bang bang sauce—perfect for weeknight dinners, parties, or meal prep.
Did You Make This?
Leave a comment & rating below or tag @mrsrecipe on social media!
Rate This Recipe
Share This Recipe
Enjoyed this recipe? Share it with friends and family, and don't forget to leave a review!
Comments (1)
This recipe looks amazing! Can't wait to try it.
Comments are stored locally in your browser. Server comments are displayed alongside your local comments.
Hi, I'm Clara!
What's Popular

Get My 30-Minute Meals email series!
Quick and easy dinner ideas delivered to your inbox.