
Easy Easter Rice Krispie Nests

Crunchy puffed rice and gooey marshmallow shaped into adorable Easter nests, finished with melted chocolate and candy eggs — a simple, kid-friendly holiday treat.

This charming little Easter treat has been a staple in my kitchen for as long as I can remember. I first made these nests at a school bake sale years ago when I was short on time but determined to bring something festive. The combination of crisp puffed rice and pillowy marshmallow formed instant nostalgia, and when I added a little melted chocolate and tiny candy eggs the kids declared them magical. They are quick to assemble, transport well, and always disappear first at parties.
What I love most is how forgiving and joyful this recipe is. It produces a crunchy, chewy texture with a sweet background and a glossy chocolate center that holds two or three speckled eggs. It’s an ideal activity to do with children or as a simple last-minute confection when you want something homemade without fuss. I usually make a double batch because they’re perfect for gifting in little cellophane bags or arranging on a platter for brunch. The recipe below stays true to classic techniques but includes a few professional tips I learned along the way to improve texture, setting, and presentation.
Why You'll Love This Recipe
- Ready in about 30 minutes from start to finish, making it a perfect last-minute addition to holiday gatherings.
- Uses pantry staples: puffed rice cereal, marshmallows, butter and chocolate — easy to source and economical.
- Kid-friendly assembly and decorating makes it a fun family activity; no sharp knives or hot ovens required.
- Make-ahead friendly: nests set in the refrigerator and keep well at room temperature for 24 hours or refrigerated for longer.
- Versatile presentation: use different candies to match colors or dietary needs, or drizzle extra chocolate for an elegant finish.
- Gluten-free with appropriate cereal choice and marshmallows; simple swaps let you tailor for different diets.
My family’s reaction the first time I added a little melted chocolate to the centers was immediate delight. The contrast of textures — crackly cereal, fluffy interior, and a silky chocolate cup holding candy eggs — elevated a humble treat into something that felt special. Over the years I tweaked stirring and cooling times so each nest holds its shape and stays crisp rather than becoming sticky.
Ingredients
- Puffed rice cereal (6 cups): Use a crisp puffed rice like Rice Krispies for the light crunch. If you prefer gluten-free, choose a certified gluten-free puffed rice brand. Measure by filling a one-cup measuring cup level and repeat six times.
- Unsalted butter (1/4 cup): Salted butter will work, but I recommend unsalted so you can control seasoning; this amount adds richness and helps the marshmallows melt smoothly.
- Mini marshmallows (10 ounces): Mini marshmallows melt faster and give a smoother coating. Ten ounces is roughly one 10-ounce bag, which provides the right chewiness without becoming overly dense.
- Vanilla extract (1 teaspoon): Adds depth and rounds the sweetness. Use pure vanilla for the best flavor; imitation works in a pinch but lacks warmth.
- Chocolate chips (1 cup): Use milk chocolate for a sweeter finish or semi-sweet if you prefer contrast; one cup is ideal for filling centers and drizzling.
- Vegetable oil or coconut oil (1 tablespoon): Stirred into melted chocolate to make it shiny and pourable; coconut oil will add a hint of tropical flavor.
- Mini candy eggs: Such as Cadbury Mini Eggs, small jelly beans, or other speckled candies for decoration. Have a few extras for replacements and presentation.
Instructions
Prepare Your Workspace: Line a baking sheet with parchment or wax paper. Lightly grease your hands or a spoon with butter or nonstick spray so the sticky mixture is easier to handle. Arrange candies nearby so you can decorate quickly once the centers are filled. Melt Butter and Marshmallows: In a large microwave-safe bowl combine the butter and mini marshmallows. Microwave on high for 1 minute, stir, then continue in 30-second bursts stirring after each until completely melted and smooth. Expect about 2 to 3 minutes total depending on your microwave. Stirring regularly prevents hot spots and ensures even melting. Stir in Vanilla: Once smooth, stir in 1 teaspoon vanilla extract. This small addition balances the sweetness and deepens the flavor. Mix thoroughly so the vanilla disperses evenly through the marshmallow. Combine with Cereal: Add the 6 cups puffed rice cereal to the marshmallow bowl. With a buttered spatula or spoon, fold gently to coat every piece without crushing the cereal. Work quickly while the mixture is warm and pliable. Form the Nests: Using greased hands, scoop about 1/4 cup of the mixture and form into a ball. Press your thumb into the center to create a shallow indentation that will become the nest cup. Place each formed nest on the prepared sheet. This method yields approximately 24 small nests. Chill to Set: Refrigerate the tray of nests for about 15 minutes to firm them up. Chilling helps the nests hold shape and makes adding chocolate easier without melting the marshmallow further. Melt the Chocolate: In a microwave-safe bowl, melt the chocolate chips in 30-second intervals, stirring until smooth. Stir in 1 tablespoon vegetable or coconut oil for gloss and easier pouring. Alternatively, melt over a double boiler on low heat. Decorate and Finish: Once nests are firm, spoon a small amount of melted chocolate into each center and immediately place 2 to 3 mini candy eggs into the chocolate before it sets. Allow chocolate to harden at room temperature or chill briefly in the refrigerator until fully set.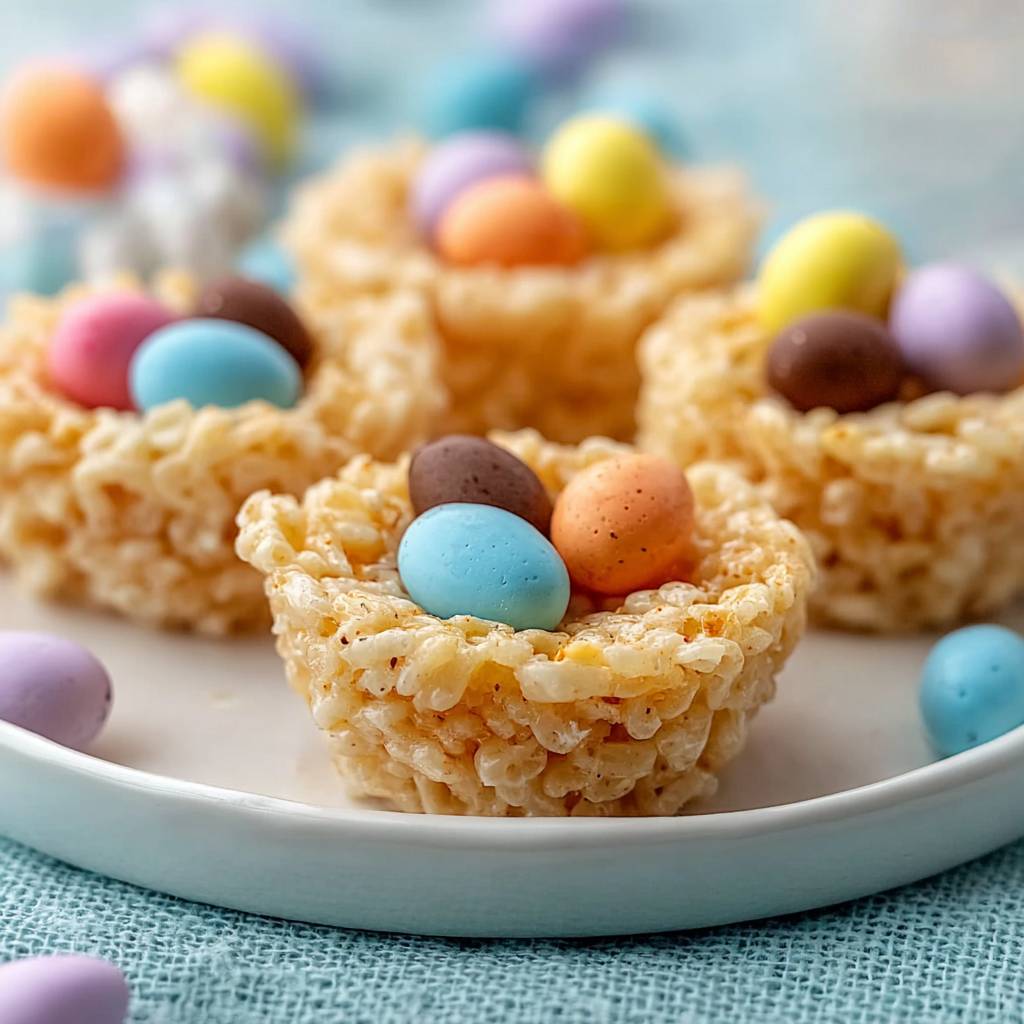
You Must Know
- These treats are best eaten within 24 to 48 hours for optimal crispness; refrigeration can extend life up to 5 days but may soften texture.
- Freeze finished nests for up to 3 months in an airtight container with layers separated by parchment; thaw in the refrigerator to avoid condensation pooling on the chocolate.
- Each nest contains dairy and likely gelatin from standard marshmallows; choose vegan marshmallows and dairy-free chocolate if needed for dietary needs.
- To prevent sticky fingers while forming, keep a small bowl of buttered water nearby and dip your hands briefly between shapes.
My favorite aspect of these nests is the immediacy of joy they create. I once made a batch for a neighbor potluck and the children formed an assembly line stuffing eggs into nests like little artisans. That memory taught me that these are as much about process and togetherness as they are about flavor.
Storage Tips
Store finished nests in an airtight container at room temperature for up to 48 hours to preserve crispness. If your home is warm, place them in the refrigerator in a single layer separated by parchment to prevent sticking; this will firm the chocolate but may slightly soften the cereal. For longer storage, freeze nests in a rigid container with parchment layers for up to 3 months. When reheating or thawing, move nests to the refrigerator for an hour before serving to minimize moisture buildup on the chocolate.
Ingredient Substitutions
If you need a dairy-free version, swap butter for coconut oil and choose dairy-free chocolate chips. For a vegetarian or vegan option, use gelatin-free marshmallows and plant-based chocolate. To increase crunch and flavor, stir in 1/2 cup toasted shredded coconut or a handful of chopped toasted nuts, remembering that nuts change the texture and are not suitable for nut-free events. If you want a less sweet version, use semi-sweet chocolate and a lighter hand with candy decorations.
Serving Suggestions
Serve nests on a festive platter lined with colorful paper doilies or in mini cupcake liners for neat presentation. They pair nicely with a light spring punch or a mild coffee for adults. For a brunch spread, arrange nests next to fruit bowls and small yogurt parfaits so the candy colors pop. Garnish with a tiny sprinkle of edible glitter or a dusting of powdered sugar for a whimsical touch.
Cultural Background
These nests are a modern, playful take on classic cereal treats — an American confection tradition centered on simplicity and childhood nostalgia. The concept of shaping sweetened cereal into molds dates back decades and became popular due to its hands-on appeal and quick results. Decorating with candy eggs ties the treat into springtime and Easter customs where eggs symbolize renewal and new life, making this an ideal seasonal treat.
Seasonal Adaptations
For spring, use pastel-colored candies and white chocolate centers. In autumn, swap candy eggs for candy corn and drizzle with pumpkin-spice white chocolate. For a Valentine’s version, use pink marshmallows and heart-shaped candies. These small swaps adapt the same method to holidays year-round with minimal effort.
Meal Prep Tips
To prep ahead, form nests and store them chilled in a single layer separated by parchment. Keep the melted chocolate in a sealed container and warm gently before decorating. Alternatively, fully assemble nests and freeze them; thaw in the refrigerator the day before your event. Pack nests individually in cellophane bags tied with ribbon for easy gifting and transport.
These little nests bring simple joy and bright color to any table. Whether made with children, for a potluck, or as an easy hostess gift, they are dependable, quick, and endlessly adaptable. Give them a try and make them your own with different chocolates and candies.
Pro Tips
Grease your hands or a spoon with butter to prevent sticking while shaping nests.
Chill formed nests for at least 15 minutes before adding chocolate so the centers hold their shape.
Stir melted chocolate with 1 tablespoon of oil for a glossy, easier-to-pour finish.
Work quickly when coating cereal with marshmallow to avoid crushing the flakes.
This nourishing easy easter rice krispie nests recipe is sure to be a staple in your kitchen. Enjoy every moist, high protein slice — it is perfect for breakfast or as a wholesome snack any time.
FAQs about Recipes
Can I use any puffed rice cereal?
Yes. Standard shelf-stable puffed rice cereal (such as Rice Krispies) works well. For gluten-free, use a certified gluten-free puffed rice cereal.
How can I make these vegan?
Use dairy-free chocolate chips and a vegan marshmallow brand. Replace butter with coconut oil to make the recipe vegan.
Tags
Easy Easter Rice Krispie Nests
This Easy Easter Rice Krispie Nests recipe makes perfectly juicy, tender, and flavorful steak every time! Serve with potatoes and a side salad for an unforgettable dinner in under 30 minutes.
Instructions
Prepare Your Workspace
Line a baking sheet with parchment paper or wax paper and lightly grease your hands or a spoon with butter or cooking spray to prevent sticking while shaping.
Melt Butter and Marshmallows
Combine unsalted butter and mini marshmallows in a large microwave-safe bowl and microwave on high for 1 minute. Stir, then continue microwaving in 30-second intervals, stirring each time until completely melted and smooth.
Stir in Vanilla
Once the marshmallow mixture is smooth, stir in 1 teaspoon of vanilla extract until fully incorporated to add depth of flavor.
Combine with Cereal
Add 6 cups puffed rice cereal and gently fold using a buttered spatula until evenly coated, taking care not to crush the cereal.
Form the Nests
While mixture is still warm, scoop about 1/4 cup portions, shape into nests and press an indentation in the center with your thumb. Place nests onto the prepared baking sheet.
Chill the Nests
Place the tray of formed nests into the refrigerator for about 15 minutes to firm them up for decorating.
Melt the Chocolate
Melt 1 cup chocolate chips in 30-second bursts in the microwave, stirring until smooth, or use a double boiler. Stir in 1 tablespoon vegetable or coconut oil for shine.
Decorate and Finish
Spoon a small amount of melted chocolate into each nest center and immediately add 2 to 3 mini candy eggs. Allow the chocolate to set at room temperature or chill briefly.
Last Step: Please leave a rating and comment letting us know how you liked this recipe! This helps our business to thrive and continue providing free, high-quality recipes for you.
Nutrition
Did You Make This?
Leave a comment & rating below or tag
@mrsrecipe on social media!
Categories:
You might also like...

5-Minute Thanksgiving Appetizers That Wow Every Guest
Tiny crostini topped with creamy cheese, bright cranberry, crunchy pecans and rosemary — an effortless 5-minute starter that looks festive and tastes like the holidays.

African-Style Pancakes (Fluffy, Comforting, and Easy)
Light, slightly spiced pancakes inspired by African home kitchens—fluffy, buttery, and perfect for breakfast or brunch with syrup, cinnamon sugar, or a savory filling.

Air Fryer Bang Bang Chicken Skewers
Crispy, saucy chicken skewers made in the air fryer with a sweet-spicy bang bang sauce—perfect for weeknight dinners, parties, or meal prep.
Did You Make This?
Leave a comment & rating below or tag @mrsrecipe on social media!
Rate This Recipe
Share This Recipe
Enjoyed this recipe? Share it with friends and family, and don't forget to leave a review!
Comments (1)
This recipe looks amazing! Can't wait to try it.
Comments are stored locally in your browser. Server comments are displayed alongside your local comments.
Hi, I'm Clara!
What's Popular

Get My 30-Minute Meals email series!
Quick and easy dinner ideas delivered to your inbox.