>>
30-MINUTE MEALS! Get the email series now →


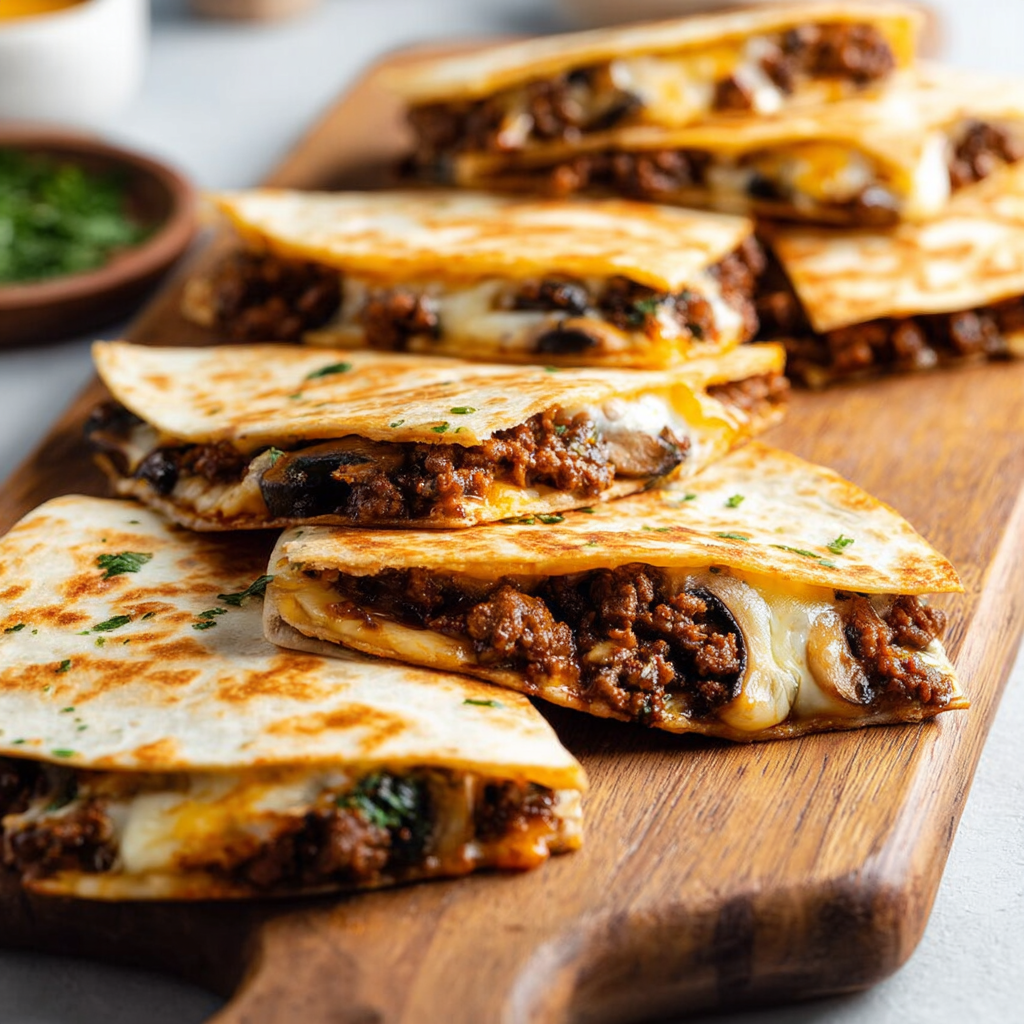
A family favorite tonight meal of golden, crispy tortillas filled with seasoned ground beef, melty cheddar and havarti, served with guacamole, salsa and lime.

This Cheesy Ground Beef Quesadillas dish has been a weekday lifesaver in my kitchen for years. I came to this combination on a busy week when pantry staples and a pound of ground beef needed to become dinner fast. The mix of sharp cheddar and creamy havarti gives each bite a reliable melt and tang that comforts without fuss. The contrast between the crisp tortilla edge and the gooey interior is the part my kids always argue over as they race to get the corner pieces.
I first tested this method for building the filling during a Sunday afternoon meal prep session. Browning the meat, then returning it to the skillet with tomato paste and a handful of greens created a concentrated savory filling that keeps well and reheats beautifully. Serve with guacamole, salsa and a squeeze of lime and you end up with a plate that feels indulgent yet balanced, a quick win for guests or a relaxed family dinner.
In my experience these quesadillas are the dish that brings family to the table quickly. My partner loved how the tomato paste deepened the beef flavor while the spinach kept it bright. Neighbors who tried them at a casual gathering asked for the recipe right away.
My favorite part of making these is the way simple pantry ingredients transform into a dish that feels celebratory. Even small changes like swapping havarti for mozzarella change the mouthfeel and make it easy to adapt for what you have on hand. Family members always remember the first time we served these at a casual game night and how the house smelled of toasted tortilla and melting cheese.
Store cooled quesadillas in an airtight container in the refrigerator for up to two days. For longer storage place individual wedges on a baking sheet freeze until firm then transfer to a freezer bag for up to three months. To reheat from frozen bake at three hundred fifty degrees Fahrenheit on a baking sheet until warmed through about twelve to fifteen minutes turning once for even crispness. Reheating in a skillet over low heat with a lid preserves the crisp exterior and avoids a soggy center.
If you need to change ingredients do it with proportion in mind. Swap ground turkey or chicken for beef using the same one pound measure but add a tablespoon soy sauce or Worcestershire to deepen flavor. Replace havarti with Monterey jack or mozzarella for similar melt. For a gluten free version use sturdy corn tortillas warmed and pressed briefly to avoid cracking. For dairy free omit cheese and serve with extra guacamole and a smoky salsa.
Serve wedges with guacamole, sour cream and a bright tomato salsa. Add pickled red onions or quick slaw for acidity and crunch. For a party set up a build station with hot quesadillas kept warm in a low oven and bowls of toppings: sliced jalapeños, chopped cilantro and lime wedges. Pair with a crisp green salad or black beans and rice for a fuller plate.

Make the beef filling ahead and keep it refrigerated for up to two days. When you are ready to eat warm the filling in a skillet to return moisture then assemble and cook tortillas fresh for the best contrast of crispy exterior and melty interior. Portion filling into one eighth batches per tortilla so assembly is fast. Use parchment lined trays for stacking quesadilla halves when serving a crowd to prevent sticking.
In spring and summer fold in fresh tomatoes or roasted peppers for brightness. In fall swap spinach for thinly sliced roasted butternut or sautéed mushrooms for a heartier fall flavor. Around holidays add a pinch of cinnamon and smoked paprika to the beef for a warm profile that pairs with roasted sides. Citrus finishes are welcome year round and especially bright in winter when produce is more muted.
Flat breads filled with cheese and savory fillings have deep roots across many cuisines. The quesadilla is a Mexican inspired preparation that has evolved with regional and household variations. Using flour tortillas and a ground beef filling is a North American adaptation that blends comfort food sensibilities with Mexican flavors. The idea of mixing two cheeses to get both sharpness and creaminess is a technique used often in home kitchens for balanced melt.
Friends who tried this at a potluck raved about the crisp edge and gooey center. One reader told me they converted leftover turkey taco filling into these and the family applauded the creative reuse. A neighborhood game night turned into an impromptu tasting when different cheeses were tried side by side and cheddar havarti combination won for both adult and young palates.
These quesadillas are approachable, forgiving and endlessly adaptable. They are my go to for nights when I want something comforting that still feels a little special. Make them your own and enjoy the simple satisfaction of melted cheese and well seasoned beef shared around the table.
Grate cheese from a block for better melt and less stabilizer residue than pre shredded cheese.
Cook tortillas over medium heat so the cheese melts before the shell becomes too dark.
Portion filling into eighths per tortilla to make assembly fast and consistent.
Wipe the skillet between browning and sautéing to prevent burnt bits from affecting flavor.
This nourishing cheesy ground beef quesadillas recipe is sure to be a staple in your kitchen. Enjoy every moist, high protein slice — it is perfect for breakfast or as a wholesome snack any time.
Yes you can make the beef filling ahead and refrigerate for up to two days. Reheat gently before assembling.
For stovetop reheat, warm over low heat covered until the center is hot. For oven reheat, bake at 350 F until warmed through.
This Cheesy Ground Beef Quesadillas recipe makes perfectly juicy, tender, and flavorful steak every time! Serve with potatoes and a side salad for an unforgettable dinner in under 30 minutes.
Heat a large skillet over medium high and brown one pound ground beef breaking it into small pieces about five minutes. Transfer to a colander to drain excess fat then wipe the skillet clean.
Return the skillet to medium heat add one tablespoon oil then one cup chopped onion. Season with salt and pepper and cook about three minutes until the onion softens.
Stir in three tablespoons tomato paste and cook briefly then add one cup chopped spinach half teaspoon minced garlic and one teaspoon chili powder. Cook about one minute until greens are wilted.
Return the drained beef to the skillet mix thoroughly and stir in two tablespoons minced cilantro if using. Adjust seasoning then transfer to a bowl and clean the skillet for cooking tortillas.
Combine cheeses. Place skillet over medium heat melt half teaspoon butter then place one eight inch tortilla. Add two tablespoons cheese onto half tortilla add one eighth of beef filling top with two more tablespoons cheese fold and cook covered two minutes then flip and cook two to three minutes until golden. Let rest one minute slice and serve.
Last Step: Please leave a rating and comment letting us know how you liked this recipe! This helps our business to thrive and continue providing free, high-quality recipes for you.
Leave a comment & rating below or tag
@mrsrecipe on social media!

Tiny crostini topped with creamy cheese, bright cranberry, crunchy pecans and rosemary — an effortless 5-minute starter that looks festive and tastes like the holidays.

Light, slightly spiced pancakes inspired by African home kitchens—fluffy, buttery, and perfect for breakfast or brunch with syrup, cinnamon sugar, or a savory filling.

Crispy, saucy chicken skewers made in the air fryer with a sweet-spicy bang bang sauce—perfect for weeknight dinners, parties, or meal prep.
Leave a comment & rating below or tag @mrsrecipe on social media!
Enjoyed this recipe? Share it with friends and family, and don't forget to leave a review!
This recipe looks amazing! Can't wait to try it.
Comments are stored locally in your browser. Server comments are displayed alongside your local comments.
Quick and easy dinner ideas delivered to your inbox.